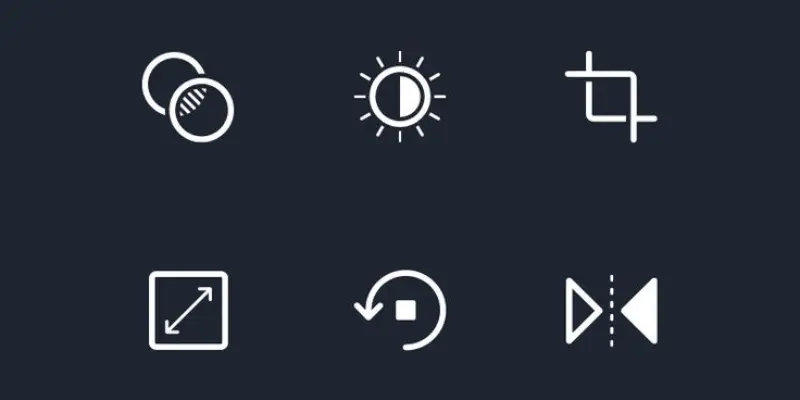
Photo editing symbol are the visual shortcuts that make your editing journey faster and more intuitive. Whether you are cropping an image, adjusting brightness, or applying filters, these symbols guide you through the process without needing to dive into complex menus. They are the unsung heroes behind polished images, helping both beginners and professionals achieve their creative vision efficiently.
Understanding these symbols is like learning a universal language of photo editing. Whether you are using apps like Photoshop, Lightroom, or mobile tools like Snapseed, these icons remain consistent and easy to recognize. In this guide, well explore what these symbols mean, how to use them effectively, and why mastering them can elevate your editing skills.
What Is Photo Editing Symbol?
Photo editing symbols are small pictures or icons you see in photo editing apps that help you change and improve your pictures. They act like little helpers, showing you what each tool does without needing to read a lot of words. For example, a pair of scissors might mean “crop,” which allows you to cut parts of the picture, and a sun symbol might be for “brightness,” to make your photo lighter or darker.
These symbols are super useful because they make editing easy and fun, even if you are just starting. Instead of searching through long menus, you can click on a symbol to quickly adjust colors, fix mistakes, or add cool effects. Once you learn what the symbols mean, editing photos becomes like playing a creative game.
You May Also Visit
AR Photo Editing | Complete Guide | Aarya Editz
Snapseed Background Image | Aarya Editz
Snapseed Picsart CB Background HD | Aarya Editz
Online Photo Editor Picsart | Aarya Editz
Commonly Used Photo Editing Symbols
When you are editing a photo, you will come across a few symbols that are used again and again. These symbols help you change your picture quickly and easily. Here are some of the most common ones:
1. Crop Symbol
This symbol looks like a square with a few lines around it or sometimes like a pair of scissors. It means you can cut or trim parts of your photo. If you want to remove a background or focus on something in the middle, just click this symbol.
2. Brightness/Contrast
The sun or light bulb symbol stands for brightness, and the black and white bars are for contrast. Brightness helps make your picture lighter or darker, while contrast makes the light areas brighter and dark areas darker. It helps make your photo look clearer and more vibrant.
3. Saturation
This symbol looks like a rainbow or color bars. It is used to adjust the colors in your picture. If you want your photo to look brighter and colorful, you can increase the saturation. If you want a more faded, vintage look, you can decrease it.
4. Undo Symbol
The undo symbol looks like a backward arrow. It helps you go back and fix a mistake. If you accidentally delete something or make a change you do not like, just click this to undo it.
5. Healing Brush or Clone Tool
This tool looks like a band aid or a paintbrush. It helps you remove unwanted spots, blemishes, or objects from your photo. It is great for fixing small problems like dust, pimples, or even removing people from the background.
These symbols are easy to spot and make editing your photos super fun and simple. Whether you are using a phone app or a professional photo editing tool, these are the basics that you will see the most.
How to Master Photo Editing Symbols
Mastering photo editing symbols may seem tricky at first, but once you get the hang of it, it is really fun. Here are some simple steps to help you learn how to use these symbols like a pro:
1. Start with Simple Tools
Begin by practicing with the basic symbols, like the Crop (🔲✂️) and Brightness/Contrast (☀️🌑). These are easy to use and will help you get comfortable with the idea of changing your photo. Try cropping your picture to focus on something cool, and then adjust the brightness to make your image look better.
2. Experiment and Explore
Do not be afraid to try new symbols. Click on different icons to see what they do. For example, if you see the Saturation (🌈) symbol, try making your photo extra colorful or a little less bright. The more you practice, the better you shall understand how each symbol works.
3. Undo Mistakes
If you make a mistake, don’t worry. Just click the Undo (↩️) symbol to go back and fix it. This helps you learn from your errors without making you start over.
4. Use Tutorials
Many photo editing apps have built in tutorials or help sections. These are super helpful and can guide you step by step on how to use each symbol. Watching a video or reading a guide can show you the best ways to apply these tools to make your photos look amazing.
5. Practice Makes Perfect
The best way to get better at using photo editing symbols is to keep practicing. Try editing different kinds of photos like portraits, landscapes, or selfies and see how each symbol changes the look. Over time, you well start to know exactly what each symbol does without thinking twice.
By using these tips, you will become a photo editing master in no time. Keep practicing and exploring, and you will soon be able to create beautiful, edited photos that you will be proud to share.
Photo Editing Symbols Cheat Sheet

Here is a simple cheat sheet to help you remember what each photo editing symbol does. Keep it handy whenever you are editing photos.
1. Crop (🔲✂️)
- What it does: Allows you to cut out parts of your photo to focus on something important.
- When to use it: If you want to remove extra space around your picture or change its shape.
2. Brightness/Contrast (☀️🌑)
- What it does: Changes how light or dark your photo looks and adjusts the difference between light and dark areas.
- When to use it: If your photo is too dark, too bright, or does not have enough “pop.”
3. Saturation (🌈)
- What it does: Makes the colors in your photo brighter or duller.
- When to use it: If you want your colors to look more vivid or a little faded.
4. Undo (↩️)
- What it does: Takes you back to the previous step to fix a mistake.
- When to use it: If you accidentally changed something and want to undo it.
5. Healing Brush/Clone Tool (🔧)
- What it does: Helps you remove imperfections or unwanted objects in your photo by “painting” over them.
- When to use it: To fix little things like spots, pimples, or background clutter.
6. Zoom (🔍)
- What it does: Lets you zoom in or out on your picture to see details more clearly.
- When to use it: If you need to work on small areas or check fine details in your photo.
7. Sharpen (⚡)
- What it does: Makes your photo appear clearer and sharper by adding focus.
- When to use it: If your photo looks blurry or you want more detail.
8. Text (A)
- What it does: Adds words to your photo.
- When to use it: If you want to put captions, labels, or quotes on your image.
9. Filter (🎨)
- What it does: Changes the overall look of your photo with cool effects like black and white, vintage, or bright color styles.
- When to use it: If you want to give your photo a fun or artistic look.
10. Rotate (🔄)
- What it does: Turns your photo around so it is the right way up or at a different angle.
- When to use it: If your photo is sideways or you want a new perspective.
This cheat sheet will help you quickly figure out what each symbol does while editing your photos. Keep practicing, and soon you will know what all the symbols mean without even thinking.
You May Also Visit
Bulb Png Picsart | Complete Guide | Aarya Editz
Photo Edit For Visa | Detail Guide | Aarya Editz
Best Lightroom Presets Free Download | Aarya Editz
Edit Love Video | Detail Guide | Aarya Editz
Advantages and Disadvantages of Photo Editing Symbol
Photo editing symbols can make pictures look amazing, but they have both good and bad sides. Lets explore how these symbols can help and when they might cause problems.
Benefits of Photo Editing Symbol
Photo editing symbols are helpful tools that make pictures look better. They help you adjust colors, add effects, or fix mistakes in a fun and easy way.
| Pros |
| Easy to Use: Photo editing symbols make editing simple, especially for beginners. Instead of dealing with complicated instructions or menus, users can easily recognize tools by their icons (like crop, brightness, or saturation). This makes editing fun and easy for everyone. |
| Faster Workflow: With clear visual symbols, users can work faster. Instead of hunting through menus for tools, these symbols offer quick access to popular features, making the whole editing process quicker and more efficient. |
| Intuitive Interface: These symbols are designed to be easy to understand, even without instructions. Once you know what each symbol means, you will be able to navigate photo editing software smoothly and without trouble. |
| Standardization Across Platforms: Most photo editing apps use similar symbols for the same tasks. This means once you learn how to use the symbols in one app, you can easily apply that knowledge to others, making it simple to switch between tools. |
Drawbacks of Photo Editing Symbol
Photo editing symbols can be fun, but sometimes they cause problems. In this post, well explore the drawbacks of using these symbols and how they affect our photos.
| Cons |
| Confusing for Beginners: For beginners, the many symbols in photo editing software can be overwhelming. Without clear labels or guidance, it can be frustrating to understand what each icon means, especially if the icons are not explained well. |
| Lack of Descriptions: While symbols are useful, they often do not come with detailed descriptions, making it difficult for users to know what each tool does. Some programs show helpful tips when you hover over icons, but not all do, which can confuse new users. |
| Not Universally Recognized: Although many apps use similar symbols, not all software follows the same system. This can be confusing if users switch between different programs, as some symbols might look alike but do different things. |
| Over Simplification: Symbols can sometimes make photo editing seem simpler than it really is. This may lead users to rely on basic tools and not explore more advanced features that could improve their editing results. |
By balancing these advantages and disadvantages, users can better understand how photo editing symbols improve their editing workflow and where they might face challenges.
Common FAQs About Photo Editing Symbols
Photo editing symbols can be confusing, but they are super helpful. In this guide, well explain some of the most common symbols you will see while editing photos.
What are photo editing symbols?
Photo editing symbols are small icons used in photo editing software and apps. They represent different tools or features, like cropping, adjusting brightness, or adding text. Instead of using words, these symbols help you quickly find and use the tools you need to edit your photos.
Why are photo editing symbols important?
Symbols make editing faster and easier by providing a simple, visual way to understand different tools. They help you work more efficiently, without having to read long instructions. Plus, once you get used to the symbols, you can use them in almost any photo editing app or software.
Are photo editing symbols the same in all apps?
Most photo editing apps use similar symbols, but some may look a little different. The basic functions, like crop, brightness, and saturation, are usually represented with the same or similar icons. However, not all apps follow the same design, so it might take some time to get used to new symbols if you switch apps.
How can I learn what each symbol means?
A great way to learn photo editing symbols is by practicing with the app or software you are using. Many apps also have built in tutorials or help sections that explain what each symbol does. You can also find cheat sheets or guides online to help you remember the most common icons.
Can I use photo editing symbols on my phone?
Yes. Many mobile photo editing apps, like Instagram, Snapseed, or Adobe Lightroom, use similar symbols for editing. These apps are designed to be user friendly, and the symbols make editing on your phone quick and easy, just like on a computer.
What do I do if I do not understand a symbol?
If you do not know what a symbol means, try clicking on it. Most apps will show a little description or tool tip when you hover or tap on an icon. You can also look up guides or tutorials online to learn more about specific symbols and how to use them effectively.
Are there any symbols I should know for beginners?
For beginners, some of the most important symbols to know are:
Crop (✂️): To cut or trim parts of your photo.
Brightness (☀️): To adjust how light or dark your photo looks.
Undo (↩️): To go back and fix a mistake.
Filter (🎨): To apply fun effects or changes to the whole photo.
Zoom (🔍): To look at the photo in more detail.
Can photo editing symbols help me fix a mistake?
Yes. The Undo (↩️) symbol is perfect for fixing mistakes. If you accidentally delete something or make a change you do not like, simply click the undo symbol to go back to the previous step and try again.
By understanding these basic photo editing symbols, you can make your photo editing experience much smoother and more fun.
Conclusion
Photo editing symbols are a great way to make editing your photos quick and easy! With just a few simple icons, you can adjust brightness, crop your pictures, add effects, and much more. Once you get familiar with these symbols, you will be able to edit your photos like a pro.
Keep practicing, and soon you will be creating stunning images that look amazing every time! Remember, photo editing symbols are here to make your editing experience smoother and more fun, so do not be afraid to explore and experiment.
You May Also Visit
Photo Editing Presets Download | Detail Guide | Aarya Editz
Snapseed Qr Presets | Complete Guide | Aarya Editz
Bird PNG Picsart | Complete Guide | Aarya Editz


